Tausend dB – Manual
Quad Signal Boost and Saturation with Mute Switches
Tausend dB is a four channel amplifier module for Eurorack in 6HP. It allows you to boost Audio and CV.
Tausend dB works great for bringing line signals to Eurorack levels, and saturating Eurorack levels into overdrive. We love to experiment with it feeding piezo signals into Eurorack.
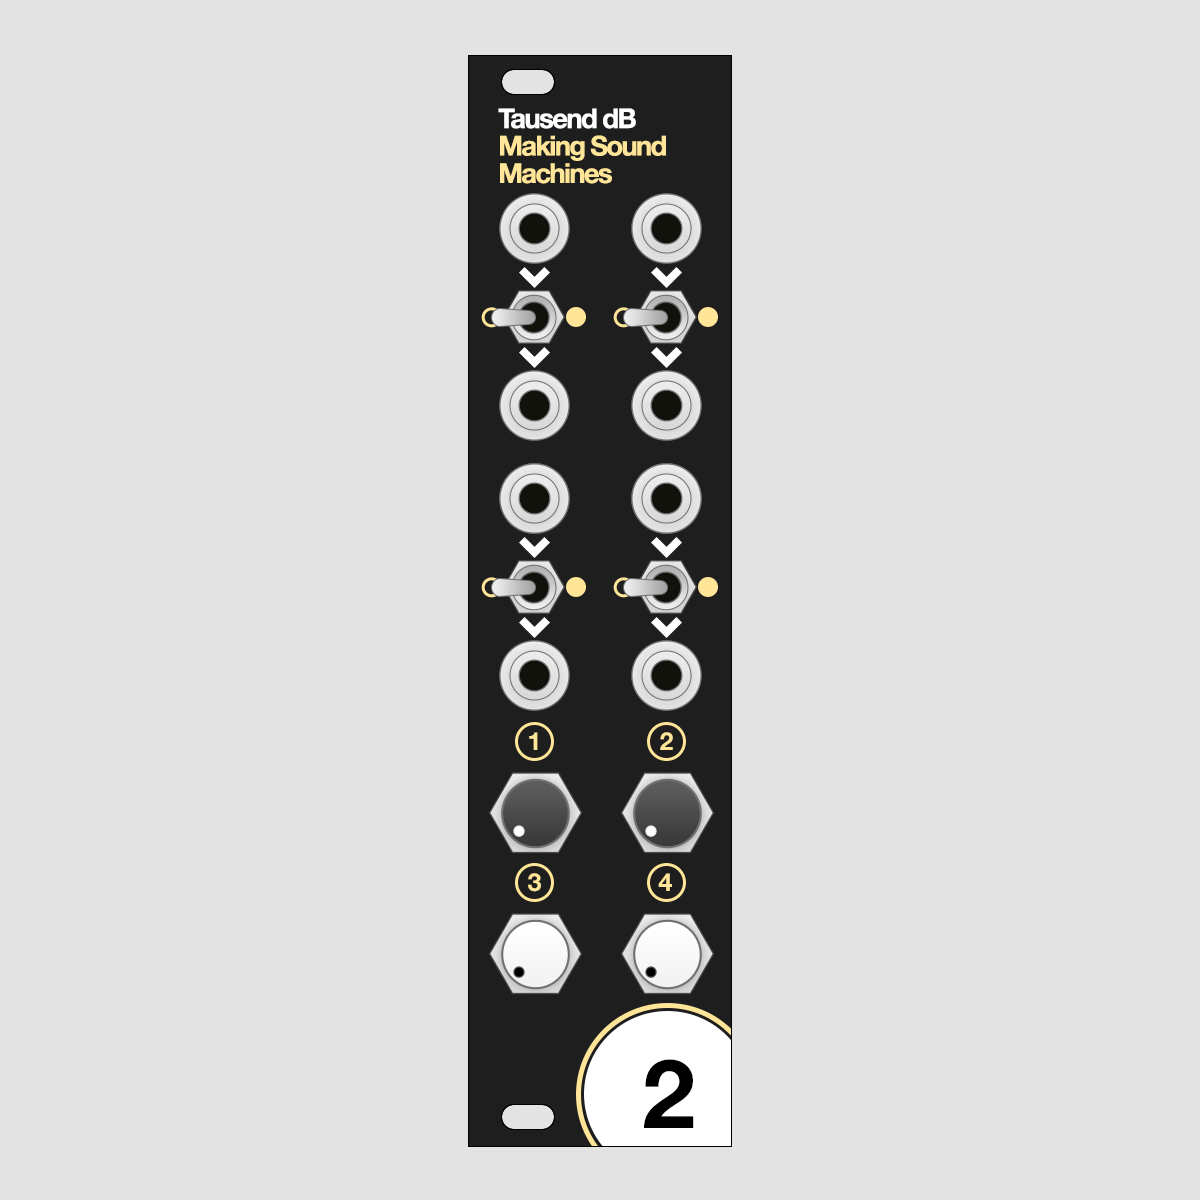
Here's a look at the front panel.
Why make another PreAmp?#

We wanted to use a lot of piezos.#
Tausend dB was inspired by Tom Whitwell's MusicThing Mikrophonie and Mutable Instruments Ears, but we needed a different set of features:
We wanted more channels, because we had a lot of contact mics, so we packed four channels into 6HP.
We needed mute switches, because we wanted to be able to act quickly when things get out of hand.
We also wanted a secret row of expander pin headers in the back, so we could boost CV and audio from our favourite gear and development boards with jumper wires: Bastl Kastl, Korg Volca Modular, Electrosmith Daisy, Teensy and Arduino.
Tausend dB limits the Voltage it lets pass to its output - when you add very hot signals, they get clipped at +11V / -11V, suitable for Eurorack Audio and CV.
This is to keep you from overpowering the inputs of your other Eurorack modules with signal levels that are too high.
Connect to power#
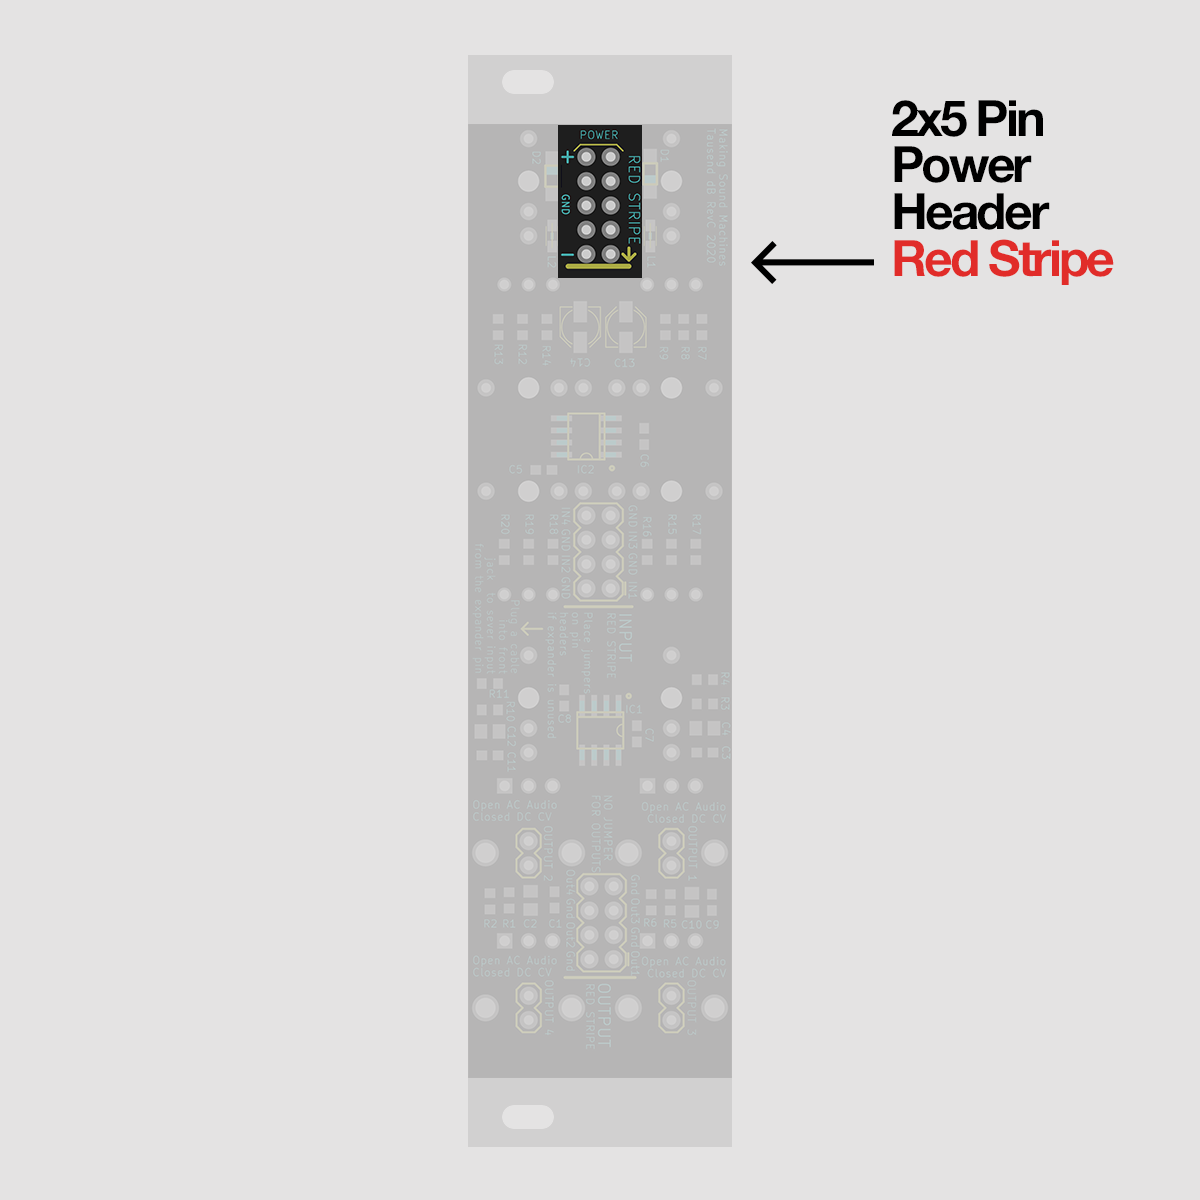
Tausend dB takes a standard 2x5 pin Eurorack power cable. We have included one with your kit.
The red stripe denotes -12V and is clearly marked on the PCB print on the back of your module.
Make sure you pay attention to the orientation of the cable both on your power bus and the module itself before you power up your system.
PreAmp Channels#
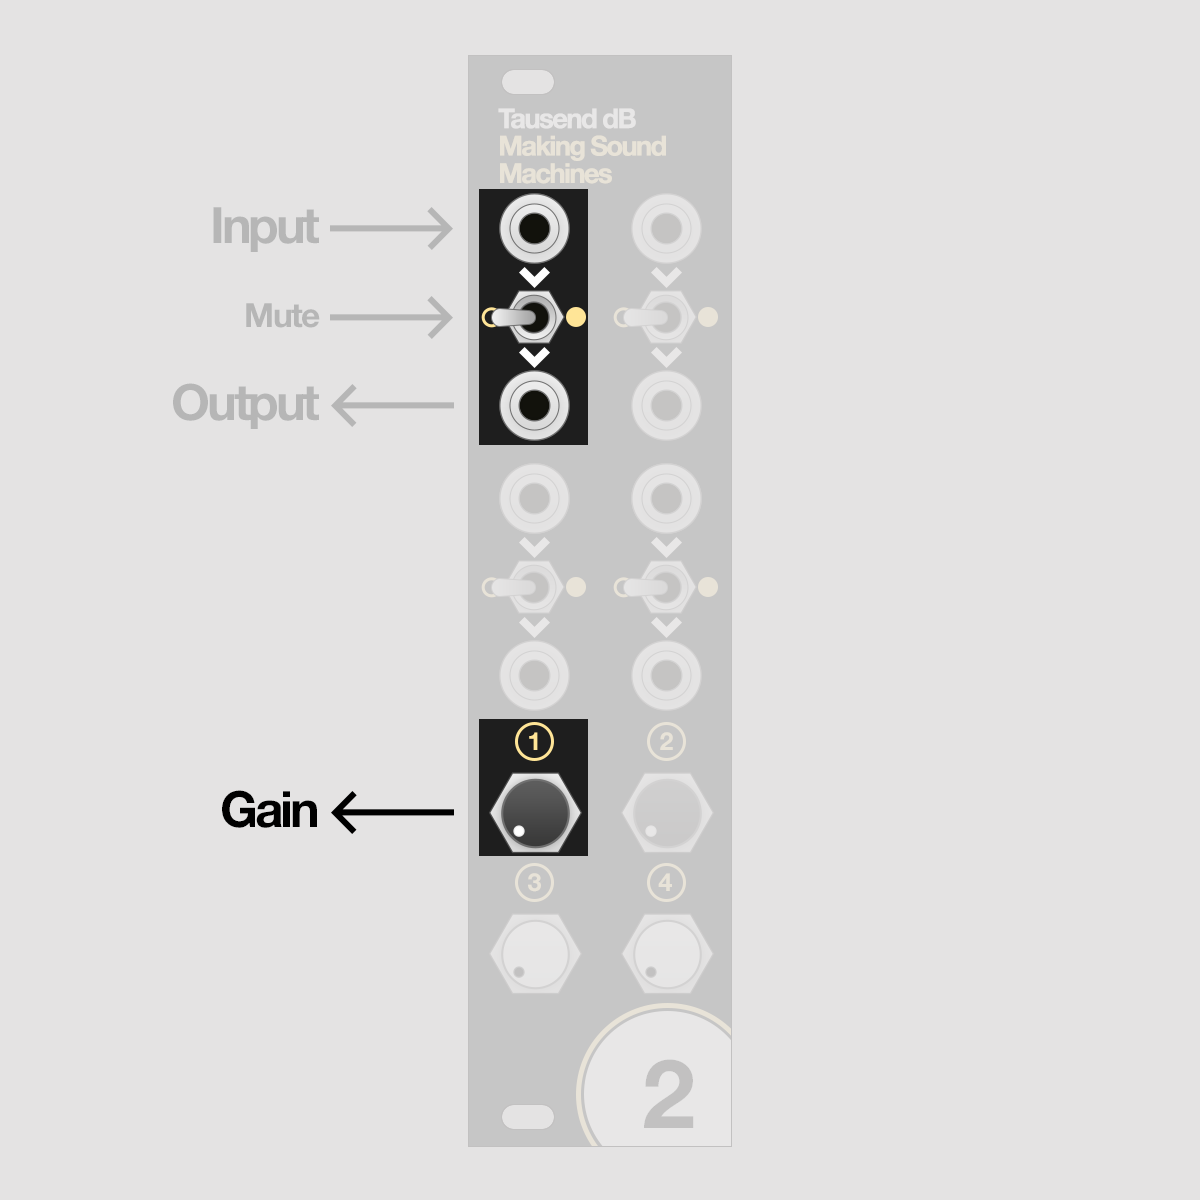
Tausend dB has four channels of PreAmps, inputs and outputs arranged in four identical-looking blocks at the top with the corresponding control potentiometer at the bottom.
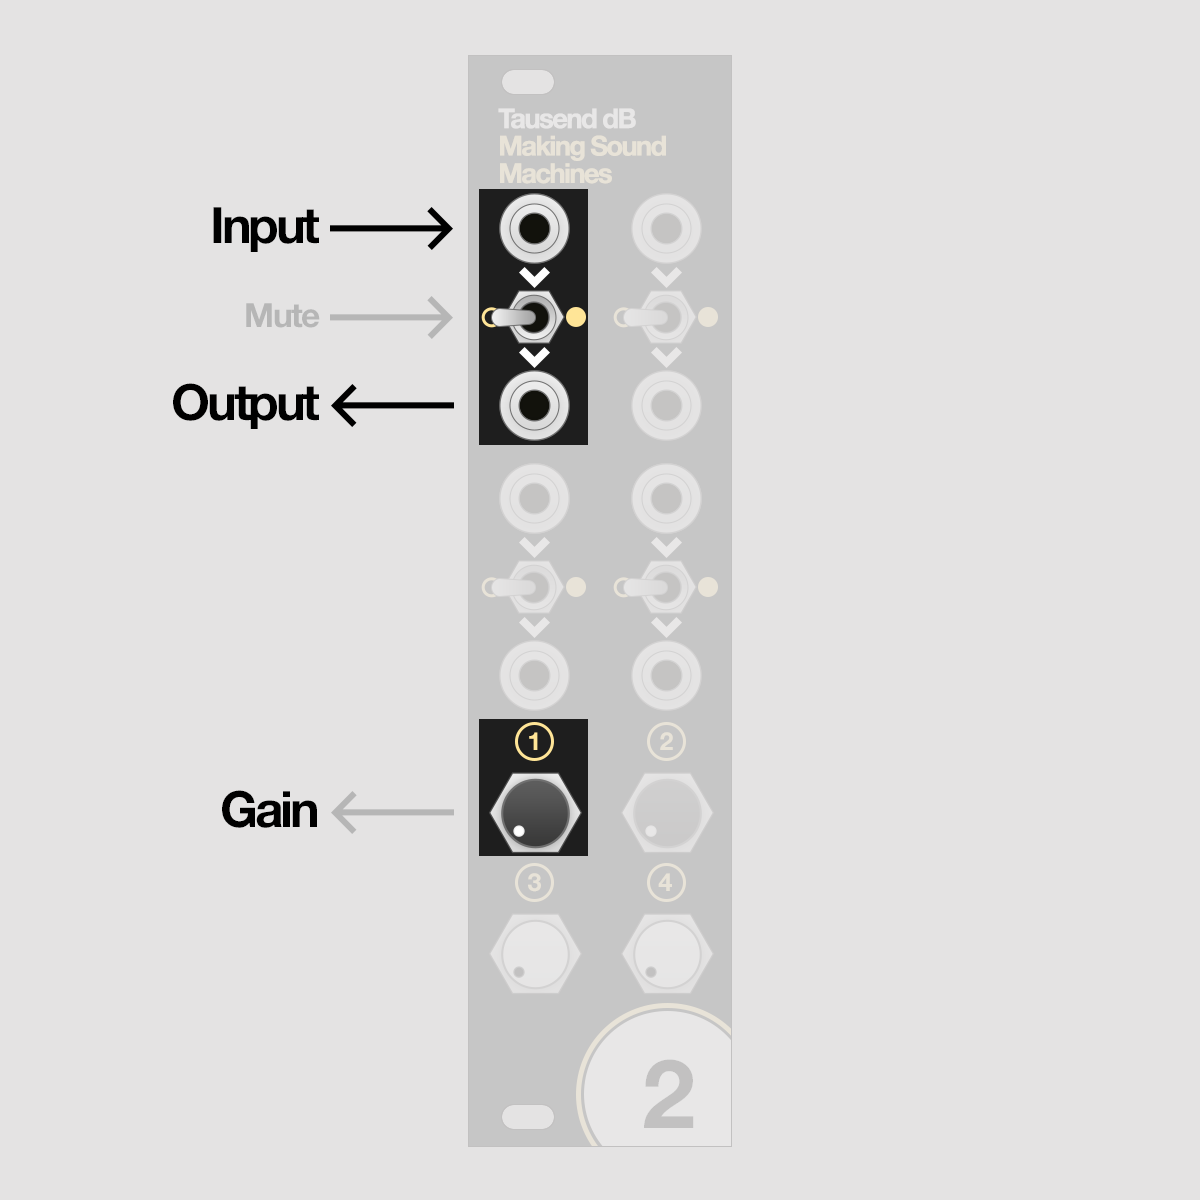
Patch an Audio or CV input signal into the jack located over the switch, and you will get the boosted signal on the output on the jack below the switch.
A single PreAmp channel looks like this.
Mute Switches#
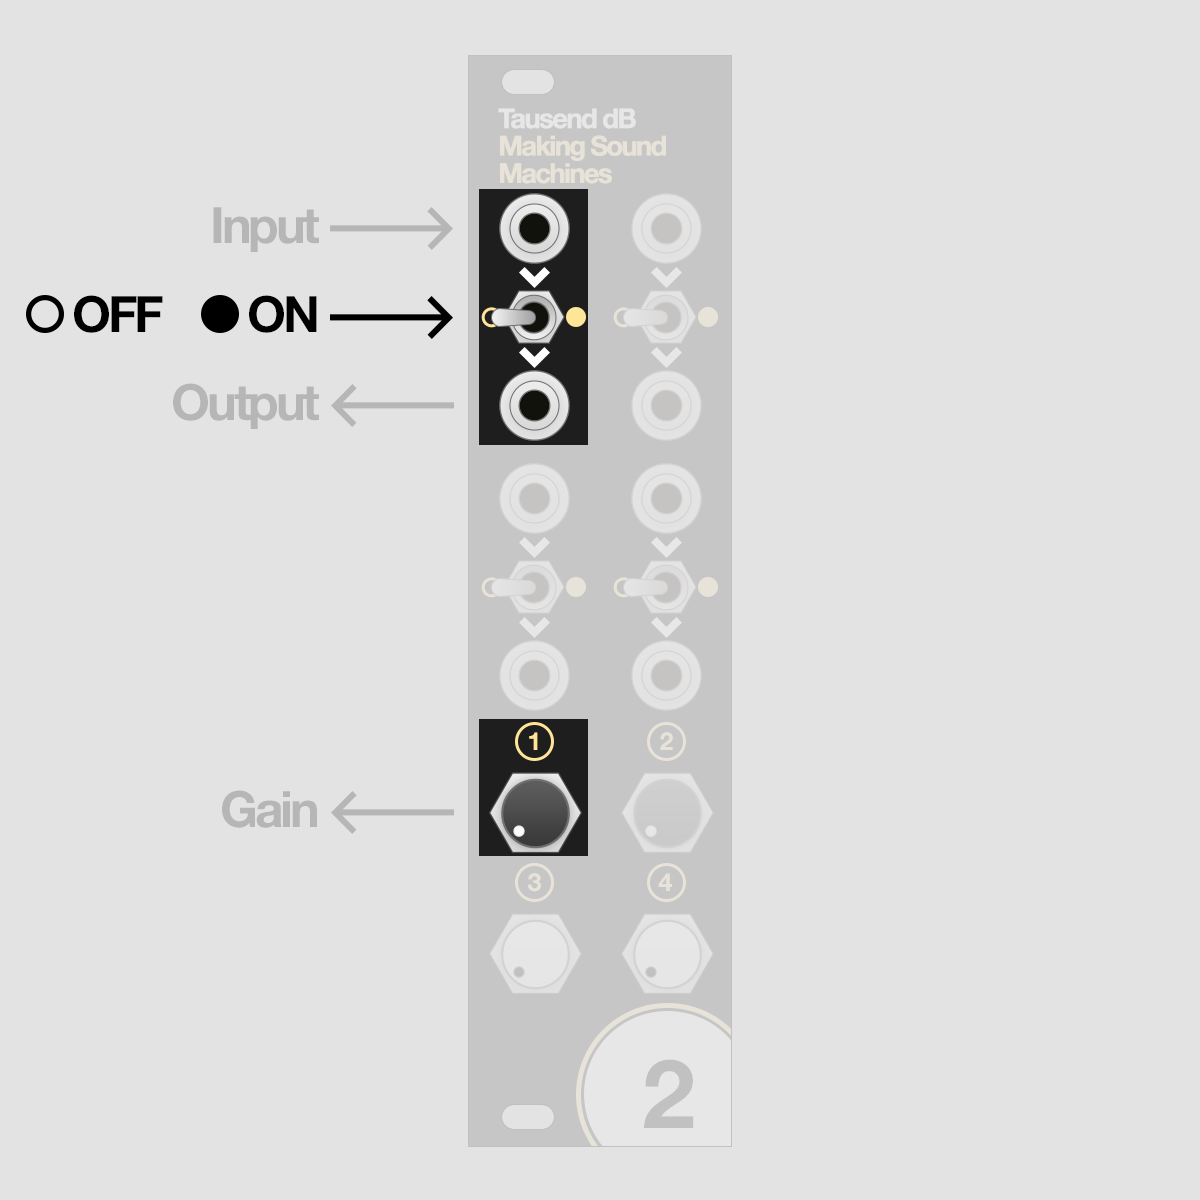
The four switches in between inputs and outputs let you mute your signal.
Position the switch to the left and the signal will be muted. Move the switch to the right and the signal will be present on the output.
Volume Potentiometers#
The four potentiometers on the bottom let you control the loudness of the signal.
When the potentiomter is closed all the way to the left the signal is fully muted.
Turn the potentiometer carefully clockwise to increase the volume. First your signal will get louder until you reach point where it begins to clip. Adjust to a level that you like and that works for the patch you are creating.
Patch Examples
Interfacing with piezo discs#
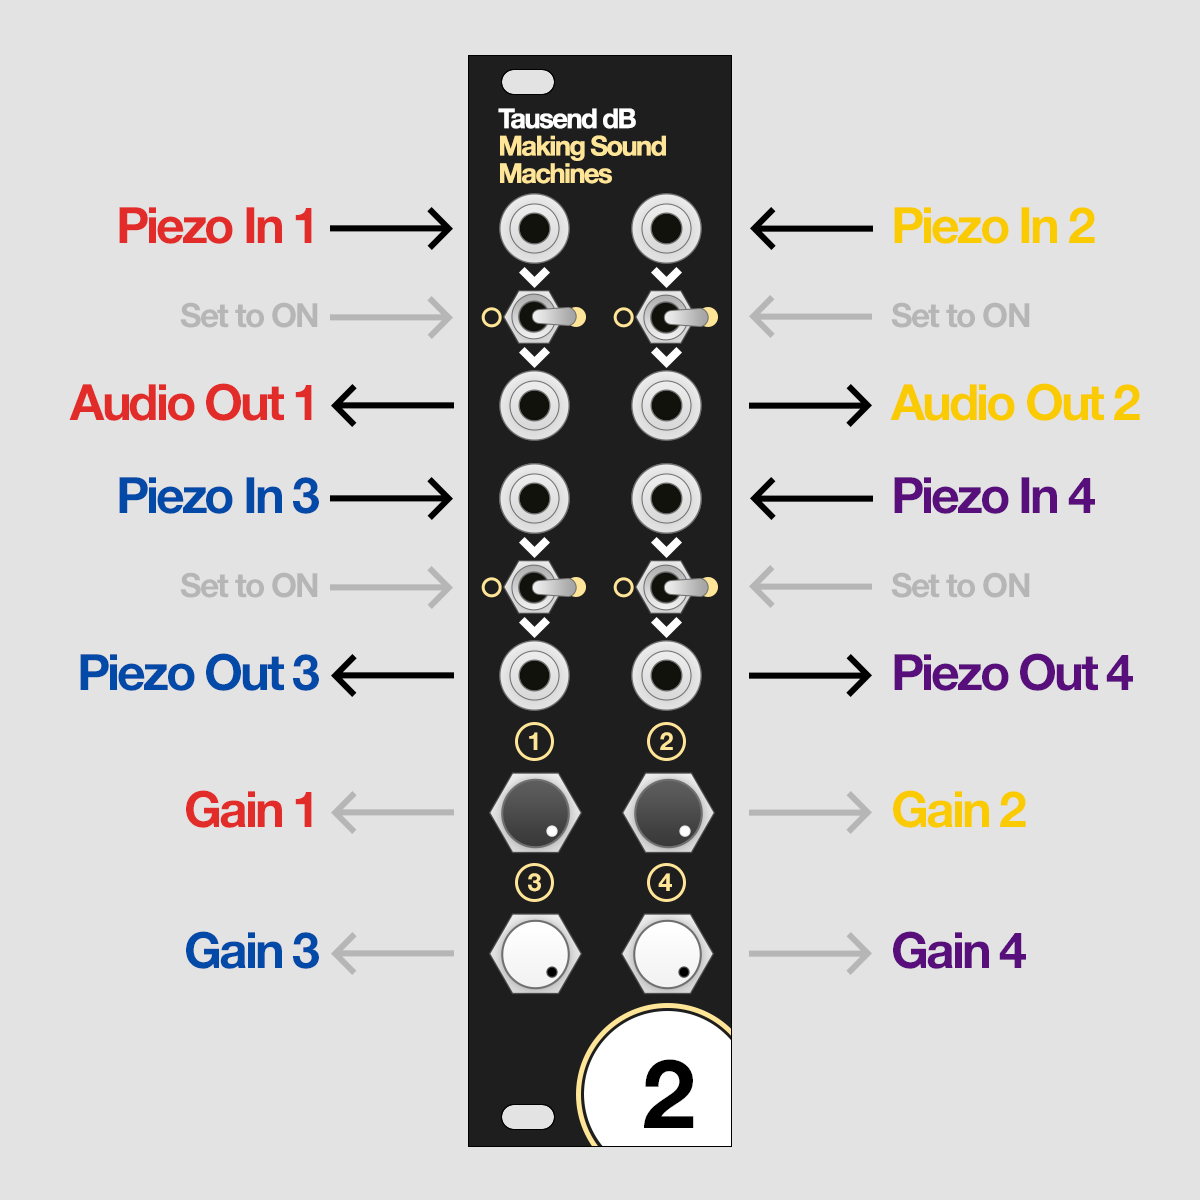
We really like using Tausend dB to interface with piezo discs in modular patches.
If you want to build your own have a look here: 'How to build your own piezo contact mic'.
Patch a piezo into the top of each block. In 1, In 2, In 3 and In 4.
The boosted piezo signals are present on the output jacks. To use the piezos as trigger sources adjust the level to a value that works best with the module you want to trigger.
We found that piezo dics with a diameter of 30mm or more work best for use as contact mics. Attach the piezo to a surface like a wooden board or a table and have fun listening to the sounds you can produce on that surface.
Bringing signals to Eurorack level#
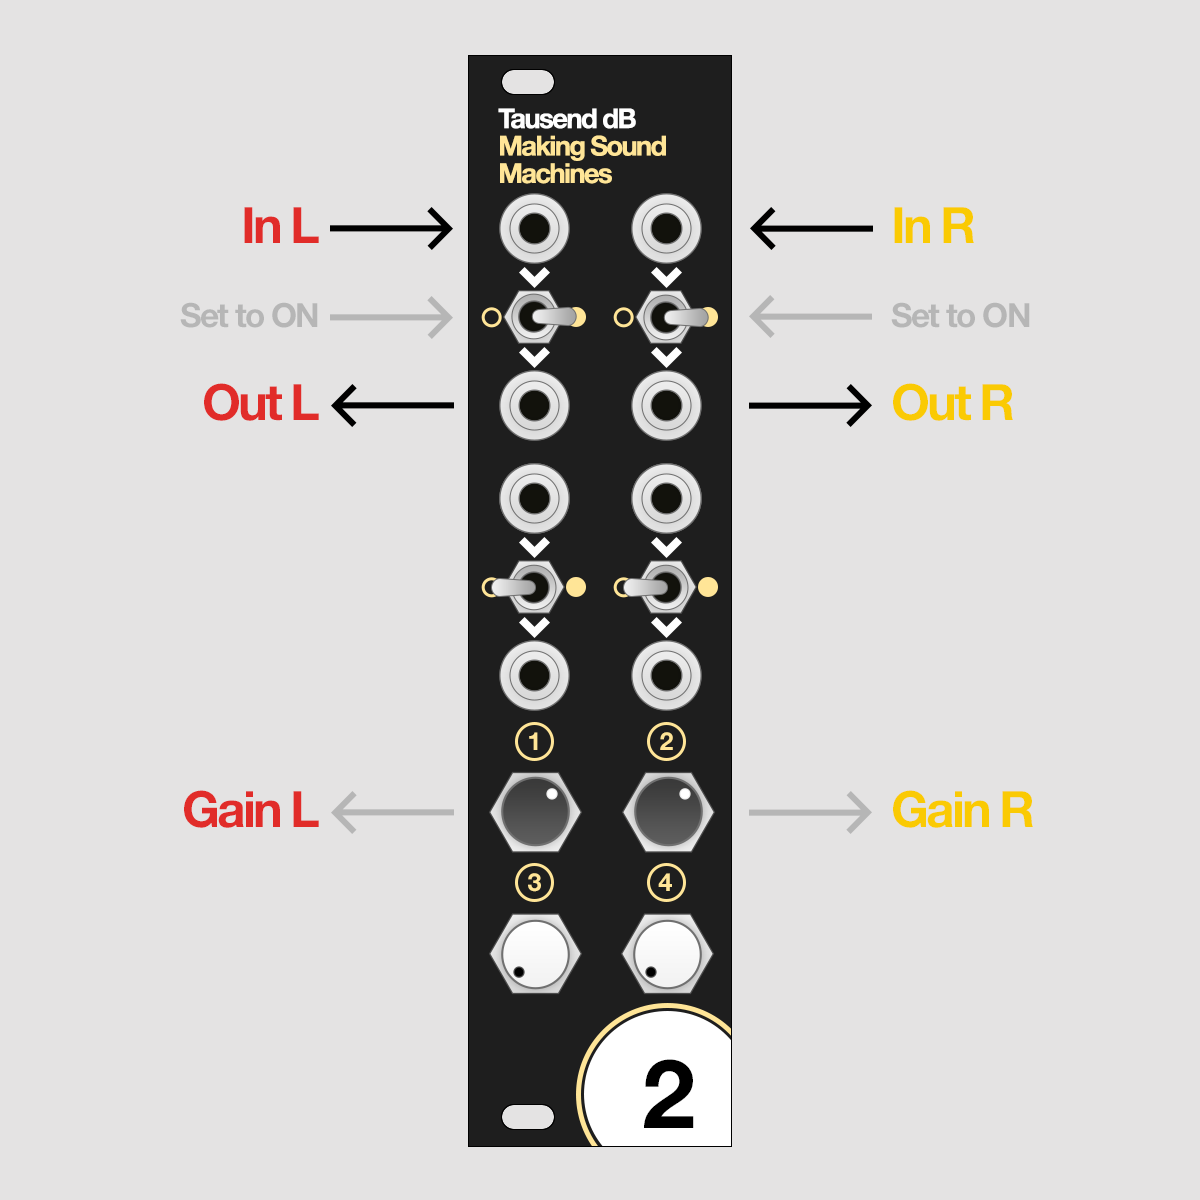
When combining desktop synthesizer and Eurorack gear sometimes you need to boost the output singals to Eurorack levels so the desktop synth are loud enough.
Patch the Left channel of your desktop synth to In 1 of Tausend dB and the Right channel the In 2.
Set Gain L and Gain R to about the same value. Now you can patch the two signals to your favourite Eurorack effect.
Hack it! A look at the pinheaders
Note
Anything beyond this point requires at least a basic knowledge of electronics.
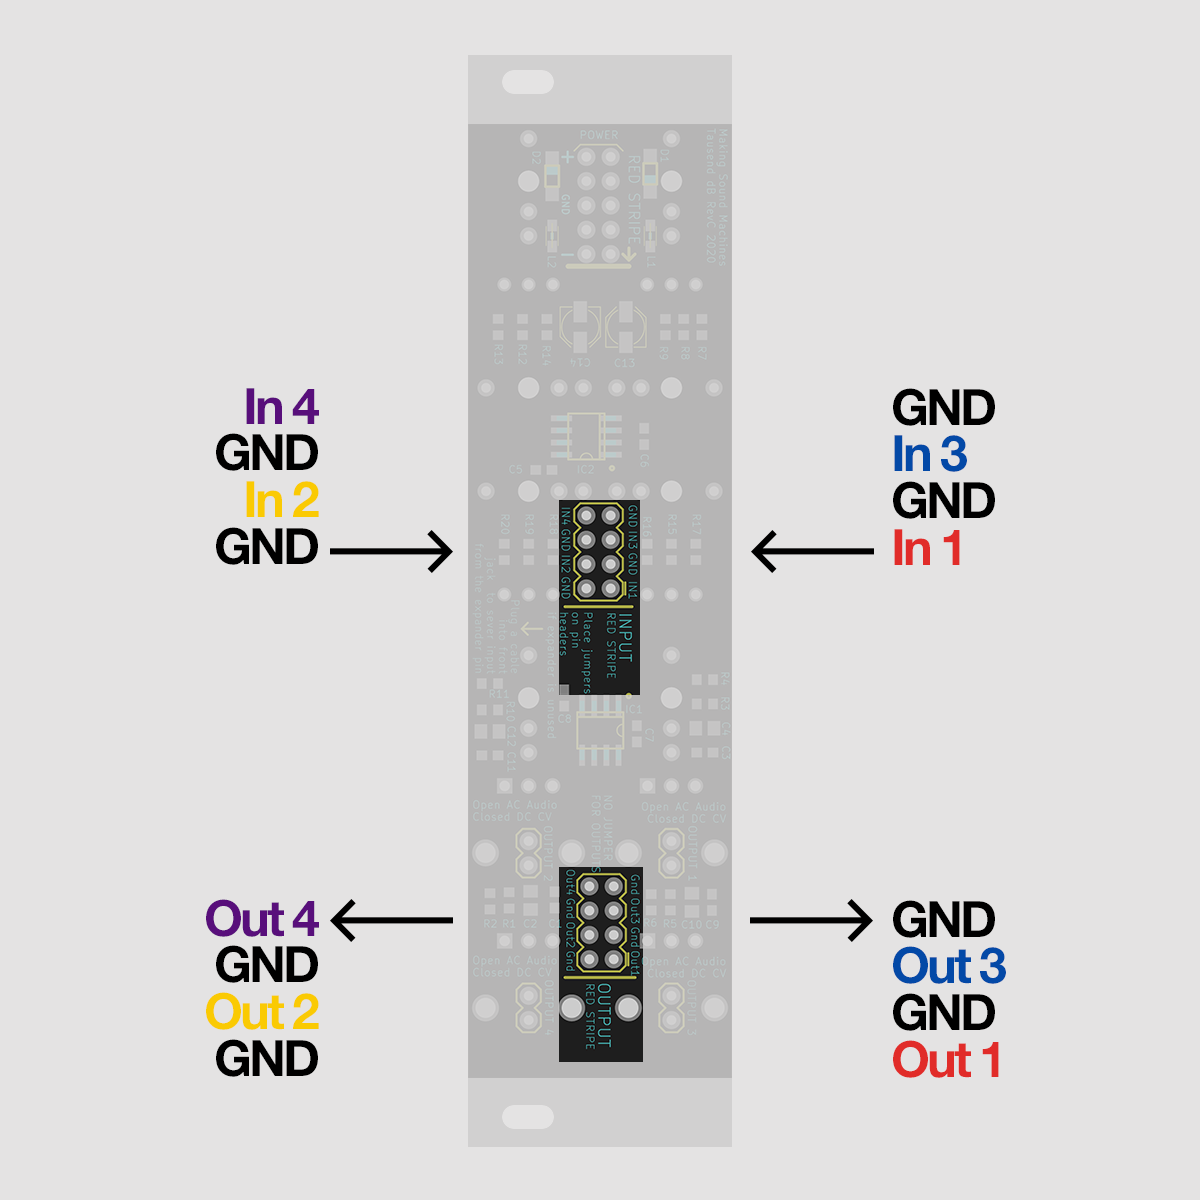
Inputs and Outputs#
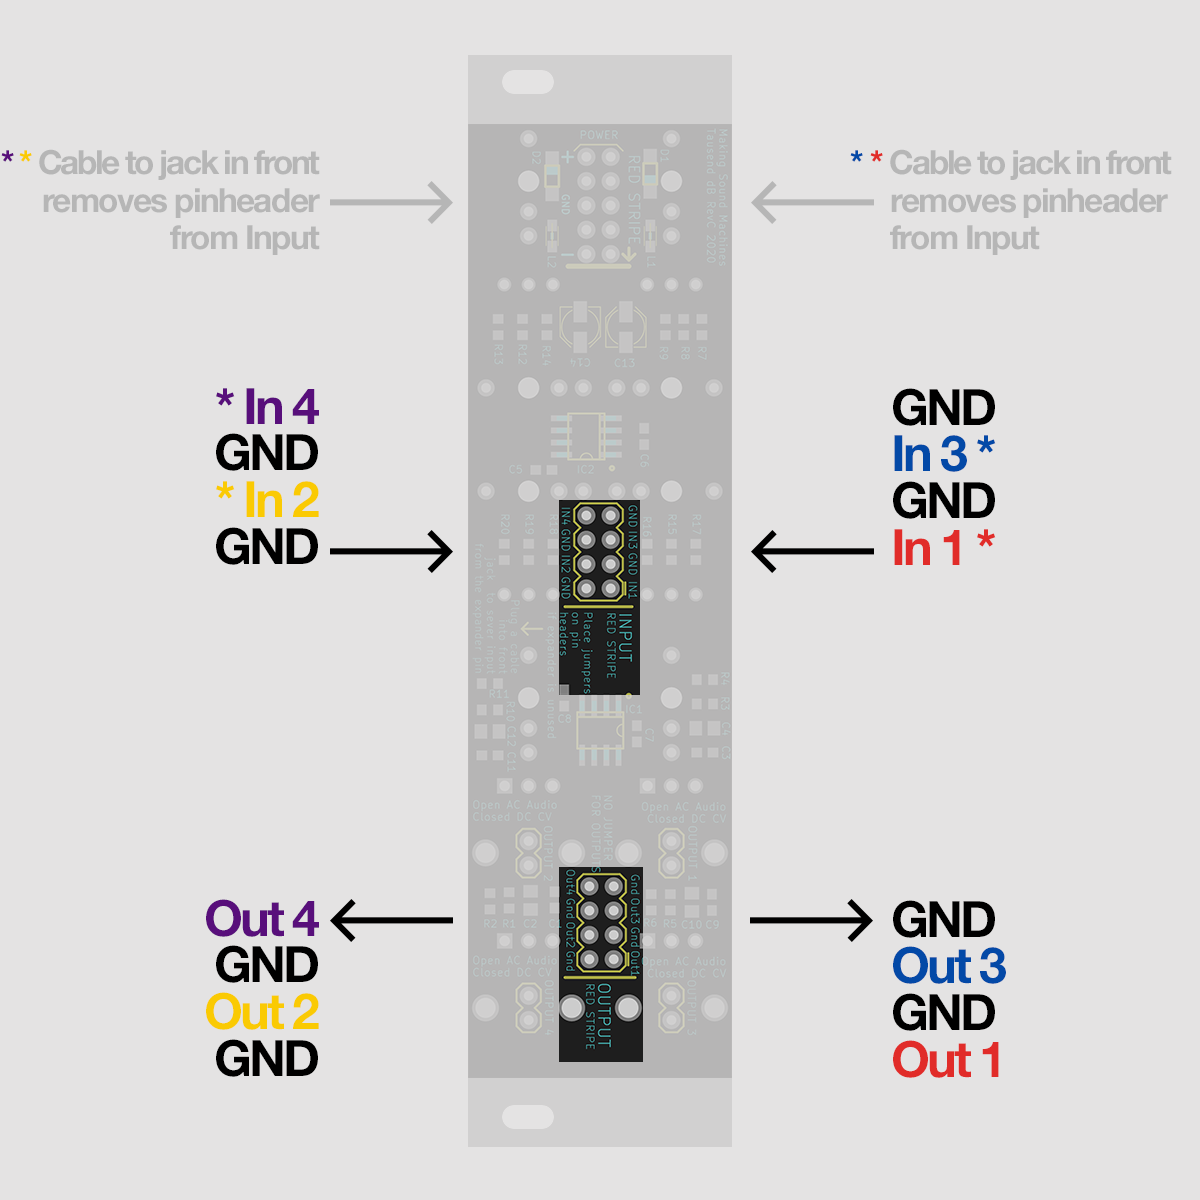
Tausend dB's input pinheaders are half-normalled with the input jacks in the front:
If you patch a cable into the front input jacks of channels 1, 2, 3 or 4, the signal from pinheaders 1, 2, 3 or 4 is removed from the input signal path.
The pinheaders come in pairs of signal and GND; If you have nothing connected to one or more of the input headers 1, 2, 3 or 4, it is imperative that you close the connection to GND with a jumper.
An open connection will make the module succeptible to noise and ground hum.
Tausend dB's output pinheaders duplicate the signal from the front jacks:
A signal on the front output jacks of channels 1, 2, 3 or 4, will be equally present signal on the pinheaders 1, 2, 3 or 4.
Connect to Arduino, Teensy and Daisy#
When prototyping ideas, nothing is more fun than whipping up a quick sketch on a prototyping platform.
Writing a few lines of code, then uploading your sketch to an Arduino, Teensy or Daisy, allows you to play with your DSP idea in the physical world.
Tausend dB enables you to bridge the gap to Modular: pinheaders in the back allow you to patch jumper wires from your proto board to Tausend dB's inputs.
Warning
Keep in mind that the microprocessors on prototyping boards only work within certain voltage ranges, beyond which you damage the processor.
Tausend dB's ins and outs work in a voltage range of +/-12V, suitable for Eurorack Audio and CV.
Prototyping boards usually deliver and take 0 - 5V or 0 - 3.3V on their pins.
You can therefore safely connect the output of your proto board to the input of Tausend dB.
However if you want to connect Tausend dB's output to your proto board, you need an additional overvoltage protection circuit before the inputs of your proto board,
to limit the incoming voltage to 0 - 5V or 0 - 3.3V.
Read the datasheet of your proto boards - ask for help if you are uncertain.